
There are bakers and there are cooks. It takes a chemist’s love of precision to be a baker. Me? I’m a cook.
However, I do love to bake bread. In fact, I’ve been on a bread baking kick for the several years, experimenting with everything from the old-fashioned knead-it-up method to neo-hippy, grow-your-own-wild-yeast-before-you-even-start-mixing-the-dough recipes. Recently, however, I learned a method so wonderful that my experimental wanderings may be over.
The breakthrough occurred when I took a class with the legendary Jim Lahey, founder of Sullivan Street Bakery in New York and the man behind a sensational recipe for no-knead, slow-rise, no-fuss bread. Maybe just reading about it left me skeptical. Could baking bread really be as easy as he suggested?
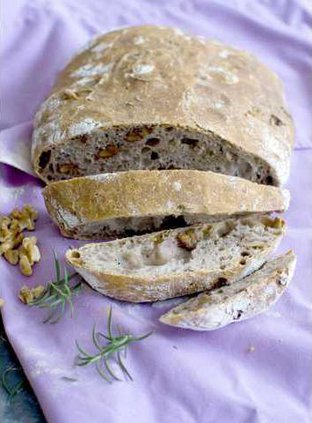
Yes, it can. I went home after the class and adjusted his basic formula to my liking, adding extra whole-wheat flour, toasted walnuts and rosemary. Otherwise, I followed his instructions, weighed the ingredients, mixed them together and turned out an attractive, delicious loaf of bread.
One of the ways to ensure your success here is by measuring your flour by weight, not volume. When you scoop and measure flour by volume — such as using a measuring cup — the amount of flour you get each time can vary widely, sometimes by several ounces. The discrepancy is due to how tightly or loosely the flour is packed. A few ounces may not sound like much, but it can make a big difference in baked goods.
That’s why I recommend investing in a good kitchen scale if you’re going to bake bread. The one I own, which registers both ounces and grams, has turned out to be useful for any number of kitchen tasks.
And please remember: This is not your grandmother’s bread, or at least it’s not your grandmother’s method of making bread. So don’t be thrown off by the wetness of the dough (it’s very wet), the temperature of the water added (it’s cool, not warm), or the temperature at which the dough first rises (it’s room temp, not warmer).
The only down side to this recipe is the need to plan ahead. Even though mixing the dough takes no time at all (30 seconds), you have to let it rise for at least 12, and preferably 18, hours. Then, after you’ve shaped it into a loaf (another 30 seconds), it needs to rise for yet another hour or two. Finally, it takes 45 to 60 minutes for the bread to bake, and it has to cool completely before you can eat it.
But if you can deal with the amount of time necessary for the dough to set up, you may find yourself eating really scrumptious, fresh and healthy artisanal bread several times a week. And every time you bake one of these loaves, your whole house smells wonderful.
Sara Moulton was executive chef at Gourmet magazine for nearly 25 years, and spent a decade hosting several Food Network shows. She currently stars in public television’s “Sara’s Weeknight Meals” and has written three cookbooks, including “Sara Moulton’s Everyday Family Dinners.”
NO-KNEAD WALNUT-ROSEMARY BREAD
Start to finish: 14 hours (20 minutes active)
Makes 1 loaf (10 servings)
INGREDIENTS
• 1/2 cup (50 grams) coarsely chopped walnuts
• 2 cups (266 grams) bread flour
• 1 cup (133 grams) whole-wheat flour
• 1 1/4 teaspoons (8 grams) table salt
• 3/4 teaspoon (2 grams) instant or rapid-rise yeast
• 2 tablespoons (6 grams) chopped rosemary
• 1 1/3 cups (350 grams) cool water (55 F to 65 F)
• Additional flour, wheat bran or cornmeal, for dusting
DIRECTIONS
Heat the oven to 350 F.
Place the walnuts in a shallow baking dish, then place in the oven on the middle shelf to toast 10 to 12 minutes. Set aside to cool.
Once the nuts are cooled, in a medium bowl stir them together with both flours, the salt, yeast and rosemary. Add the water and stir briefly with a wooden spoon or your hands, just until the dough is barely mixed, about 30 seconds. The dough should be quite wet and tacky. If it is not, add 1 to 2 tablespoons more water. Cover the bowl and let it rise at room temperature for 12 to 18 hours, or until it is more than double in bulk.
After the dough has risen, generously sprinkle a work surface with flour and gently, with the help of a plastic bench scraper, scoop out the dough onto the counter.
Working very quickly, with floured hands, fold the dough inward to the center on all sides to form a seam. Turn the dough over to form a round with the seam on the bottom. Generously sprinkle a clean kitchen towel towel with flour. Lay the towel flat on the counter and set the dough on top, seam down. Sprinkle the top of the dough lightly with flour and loosely fold the ends of towel over the dough.
Let the dough rise in a warm place for 1 to 2 hours, or until almost doubled in bulk. You will know it is ready when you poke the dough and it holds your imprint. If the dough bounces back, it is not ready.
About 30 minutes before you think the dough is ready, heat the oven to 475 F. Put a rack in the lower third of the oven, and place a covered 4 1/2- to 5 1/2-quart casserole dish in the oven to heat.
When the dough has risen, carefully remove the casserole dish from the oven and remove the lid. With the aid of the tea towel, flip the dough gently, seam side up, into the casserole, put the lid on the casserole and return it to the oven. Bake for 30 minutes. Carefully remove the lid and bake until the bread has browned nicely, another 15 to 30 minutes.
Remove the casserole dish from the oven and use a spatula or dish towel to carefully transfer the bread to a rack to cool completely before slicing.
Nutrition information per serving: 180 calories; 40 calories from fat (22 percent of total calories); 5 g fat (0 g saturated; 0 g trans fats); 0 mg cholesterol; 30 g carbohydrate; 3 g fiber; 0 g sugar; 6 g protein; 290 mg sodium.
TIME TO BAKE
A healthy, easy, no-knead bread anyone can make


